[ 살펴보기 ] NestJS - OpenAPI Types & Paramters
![[ 살펴보기 ] NestJS - OpenAPI Types & Paramters](https://cdn.hashnode.com/res/hashnode/image/upload/v1732492068287/1c925e35-0561-4e66-a823-a1cc46c302b4.jpeg)
API 작업을 한다면 각 api가 요구하는 endpoint, method, reqeust body, response type등에 대한 documentation 작업이 필요하다. 해당 포스트에선 OpenAPI specification을 통해 API를 정의하고 Swagger UI를 통해 API의 상세 spec을 확인할 수 있도록 설정하는 방법을 살펴보자.
[ 살펴보기 ] Swagger - OpenAPI Basics 포스트에서 소개했듯이 기본적인 open api specification의 형식은 다음과 같다.
openapi: 3.0.0
info:
  title: Sample API
  description: Optional multiline or single-line description in [CommonMark](http://commonmark.org/help/) or HTML.
  version: 0.1.9
externalDocs:
  description: Find out more about Swagger
  url: http://swagger.io

servers:
  - url: http://api.example.com/v1
    description: Optional server description, e.g. Main (production) server

paths:
  /users:
    post:
      summary: Add a new user.
      description: Add a new user to userlist.
      requestBody:
        description: user interface
        ...
      ...
위의 예제처럼 speficiation을 직접 작성할 수도 있겠지만 대부분 nest에서 사용할 수 있는 swagger package를 통해 open api specification 기반 api documentation 작업을 수행한다.
npm install @nestjs/swagger
package 설치가 완료되면 다음과 같이 main.ts를 수정해준다.
main.ts
import { NestFactory } from '@nestjs/core';
import { AppModule } from './app.module';
import { DocumentBuilder, SwaggerModule } from '@nestjs/swagger';

async function bootstrap() {
  const app = await NestFactory.create(AppModule);

  const config = new DocumentBuilder()
    .setTitle('API example')
    .setDescription('The API description')
    .setVersion('1.0')
    .build();
  const documentFactory = () => SwaggerModule.createDocument(app, config);
  SwaggerModule.setup('api', app, documentFactory);

  await app.listen(4000);
}
bootstrap();
DocumentBuilder class의 각종 method를 통해 title, description, version과 같은 api document 기본 information을 설정할 수 있다. 그리고 SwaggerModule의 createDocument method를 통해 document를 생성하고 SwaggerModule setup method를 통해 Swagger UI에 접속할 수 있는 path를 설정한다.
이제 npm run start:dev command를 통해 application을 실행하고 localhost:4000/api로 접속해보면 다음과 같이 swagger ui를 통해 application의 api docuemnt를 확인할 수 있다. ( 현재 필자는 user endpoint에 대한 crud를 처리하는 controller를 추가해 놓았기에 아래와 같이 users endpoint에 대한 각 spec 또한 포함되어 있다 )
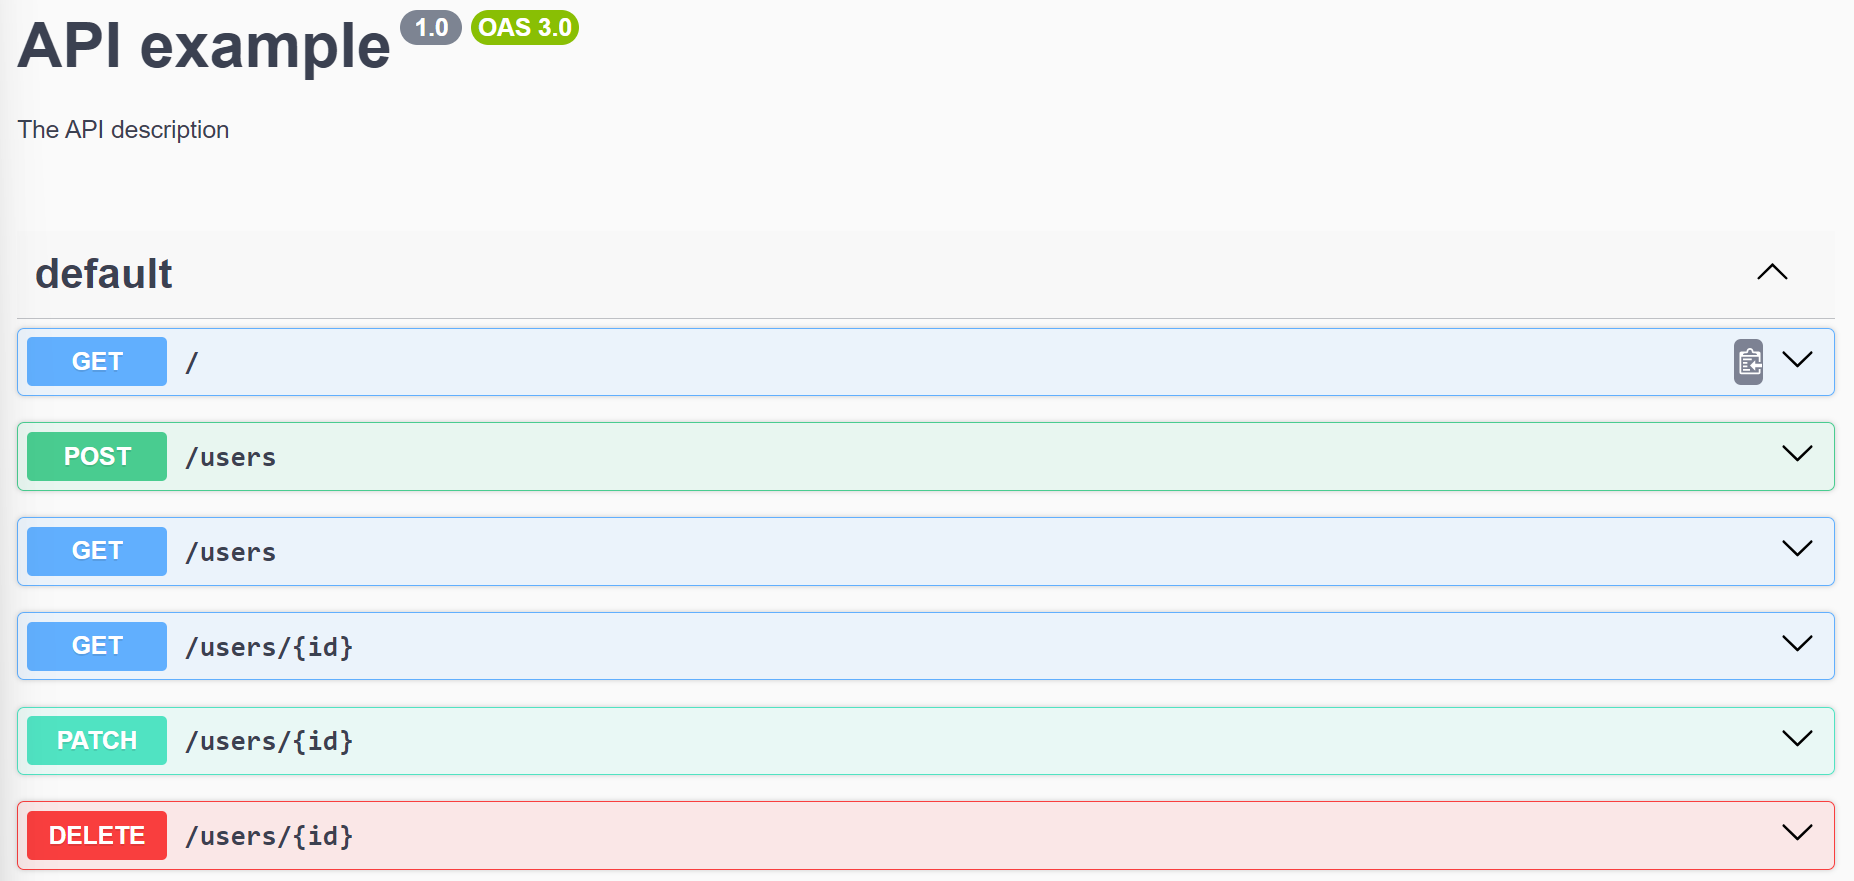
default로 localhost:4000/api-json path를 통해 api spec을 json format으로 확인할 수 있다. 만약 api의 json format을 확인할 수 있는 path를 api-json이 아닌 다른 path로 설정하고 싶다면 다음과 같이 setup method의 jsonDocumentUrl property를 통해 설정해준다. 아래 예제와 같이 jsonDocumentUrl property를 설정하면 localhost:4000/api/json path를 통해 api의 json format을 확인할 수 있다.
main.ts
...

SwaggerModule.setup('api', app, documentFactory, {
  jsonDocumentUrl: 'api/json',
});

...
Types and Parametes
이제 본격적으로 api endpoint에 대한 document 작업을 시작해보자. 현재 필자는 nest g resource users command를 통해 users endpoint에 필요한 controller, service, module, dto등을 생성한 상태이다.
user.controller.ts
import {
  Controller,
  Get,
  Post,
  Body,
  Patch,
  Param,
  Delete,
  Req,
  Query,
} from '@nestjs/common';
import { UsersService } from './users.service';
import { CreateUserDto } from './dto/create-user.dto';
import { UpdateUserDto } from './dto/update-user.dto';
import { Request } from 'express';

@Controller('users')
export class UsersController {
  constructor(private readonly usersService: UsersService) {}

  @Post()
  create(@Body() createUserDto: CreateUserDto) {
    return this.usersService.create(createUserDto);
  }

  @Get()
  findAll(@Req() request: Request, @Query('page') page: string) {
    return this.usersService.findAll(page);
  }

  @Get(':id')
  findOne(@Param('id') id: string) {
    return this.usersService.findOne(+id);
  }

  @Patch(':id')
  update(@Param('id') id: string, @Body() updateUserDto: UpdateUserDto) {
    return this.usersService.update(+id, updateUserDto);
  }

  @Delete(':id')
  remove(@Param('id') id: string) {
    return this.usersService.remove(+id);
  }
}
create-user.dto.ts
export class CreateUserDto {
  name: string;
  email: string;
}
main.ts에서 설정한 SwaggerModule은 controller에 정의된 @body, @Query, @Param decorator를 포함하여 open api document를 생성한다.
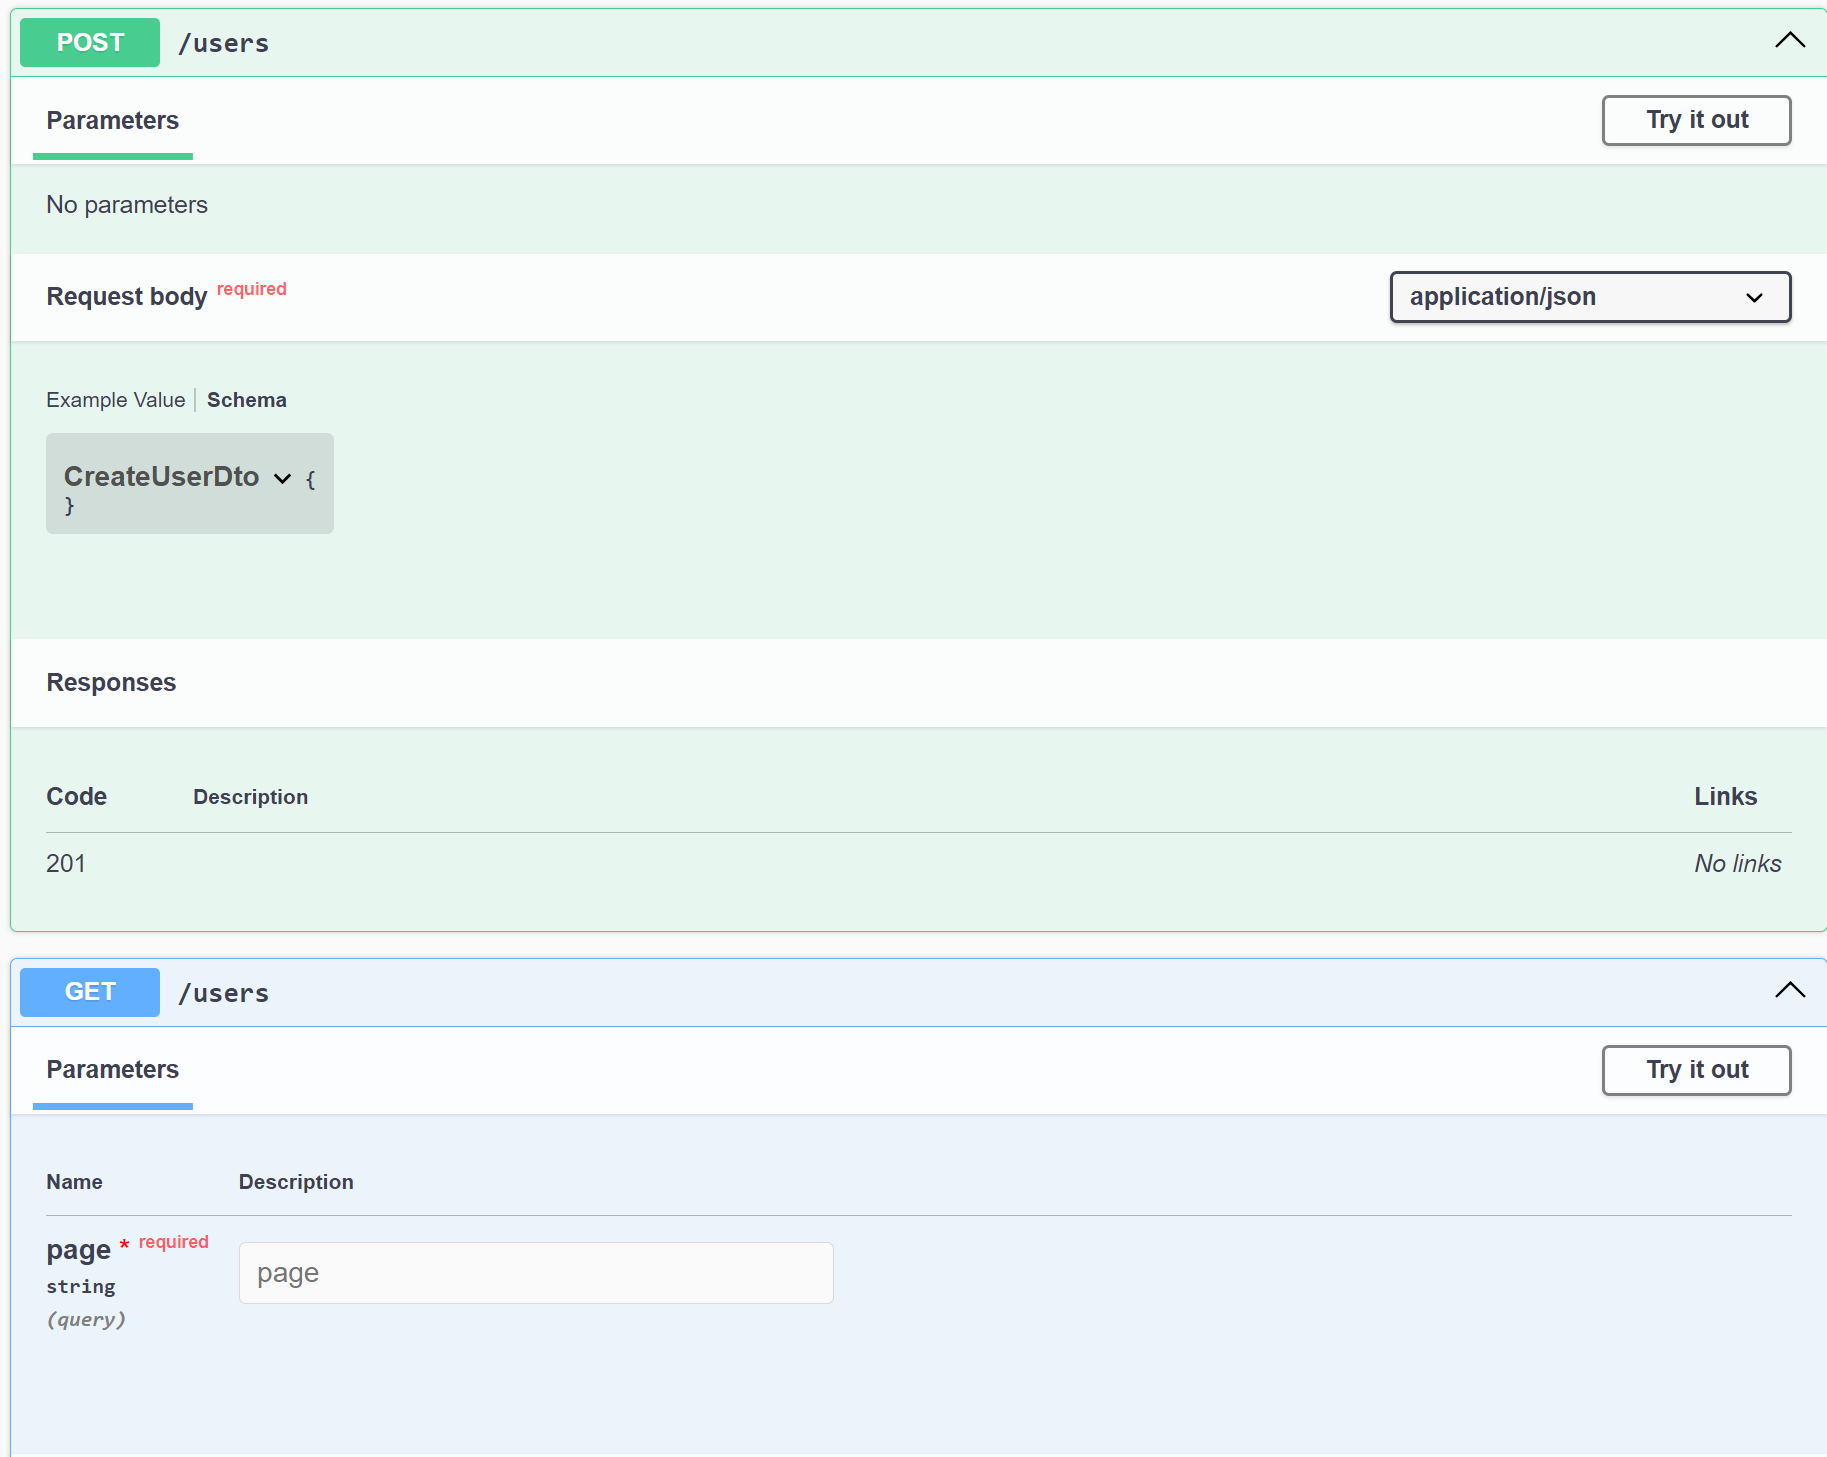
하지만 위의 이미지 에서 볼 수 있듯이 post method endpoint의 request body schema에 사용된 CreateUserDto class에 name, email fields가 선언되어 있지만 swagger ui에서는 해당 부분이 비어 있는 것을 확인할 수 있다.
CreateUserDto class의 fields를 openapi specification에 추가하기 위해선 다음과 같이 @ApiProperty decorator를 사용한다.
import { ApiProperty } from '@nestjs/swagger';

export class CreateUserDto {
  @ApiProperty()
  name: string;

  @ApiProperty()
  email: string;
}
위의 예제와 같이 @ApiProperty decorator를 추가한 fields는 다음과 같이 swagger ui에서 확인할 수 있다.
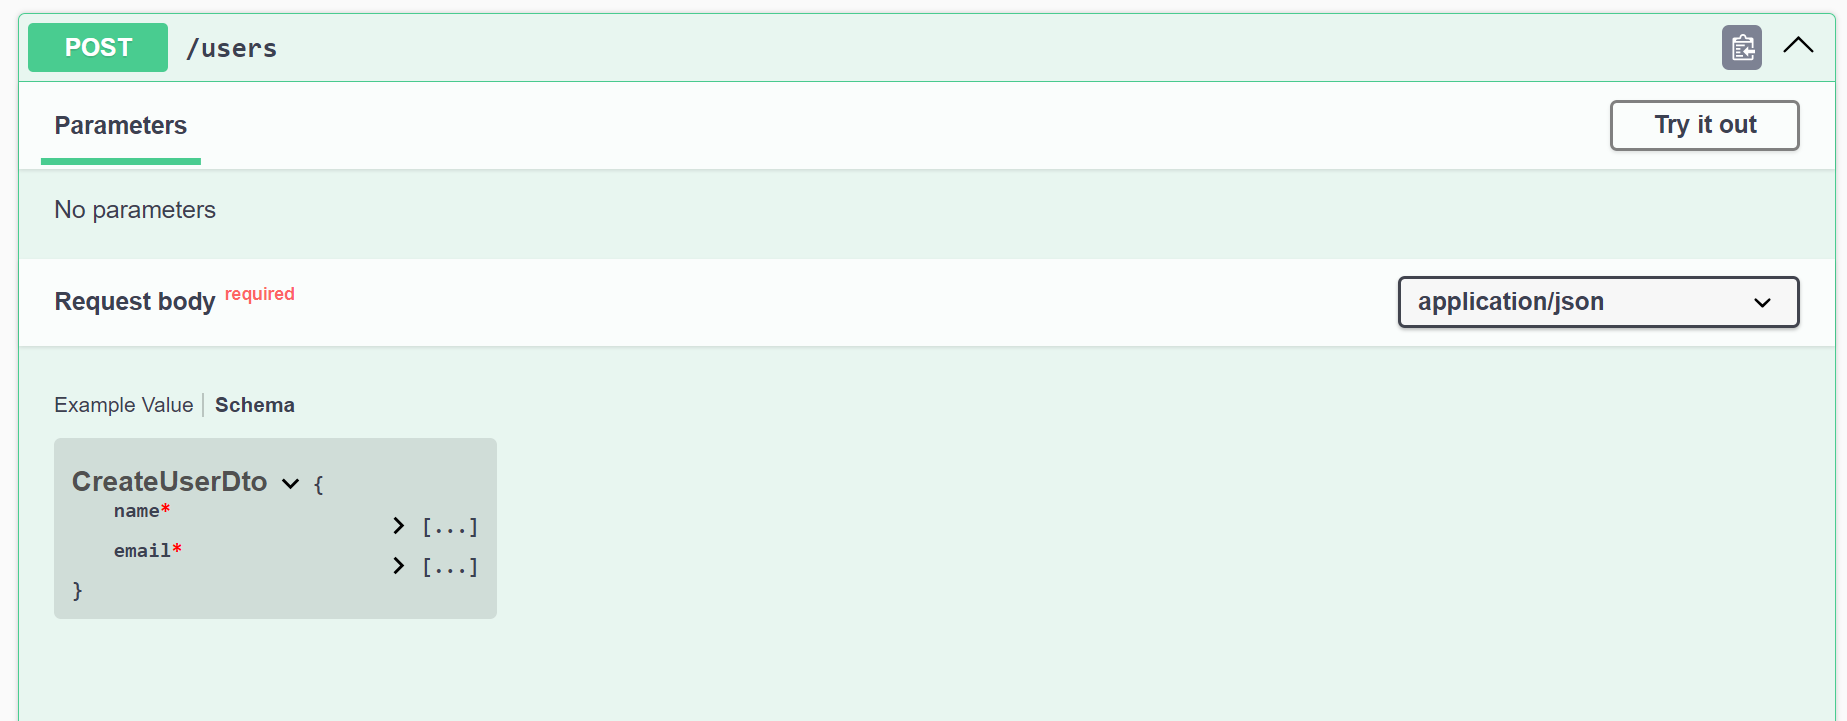
추가로 @ApiProperty를 통해 field의 추가 option을 설정할 수 있다. 다음은 open api specification의 name field에 description과 minLength option을 설정하는 예제다. 추가한 option은 swagger ui를 통해서도 확인할 수 있다.
 import { ApiProperty } from '@nestjs/swagger';

export class CreateUserDto {
  @ApiProperty({
    description: 'user name field',
    minLength: 2,
  })
  name: string;

  @ApiProperty()
  email: string;
}
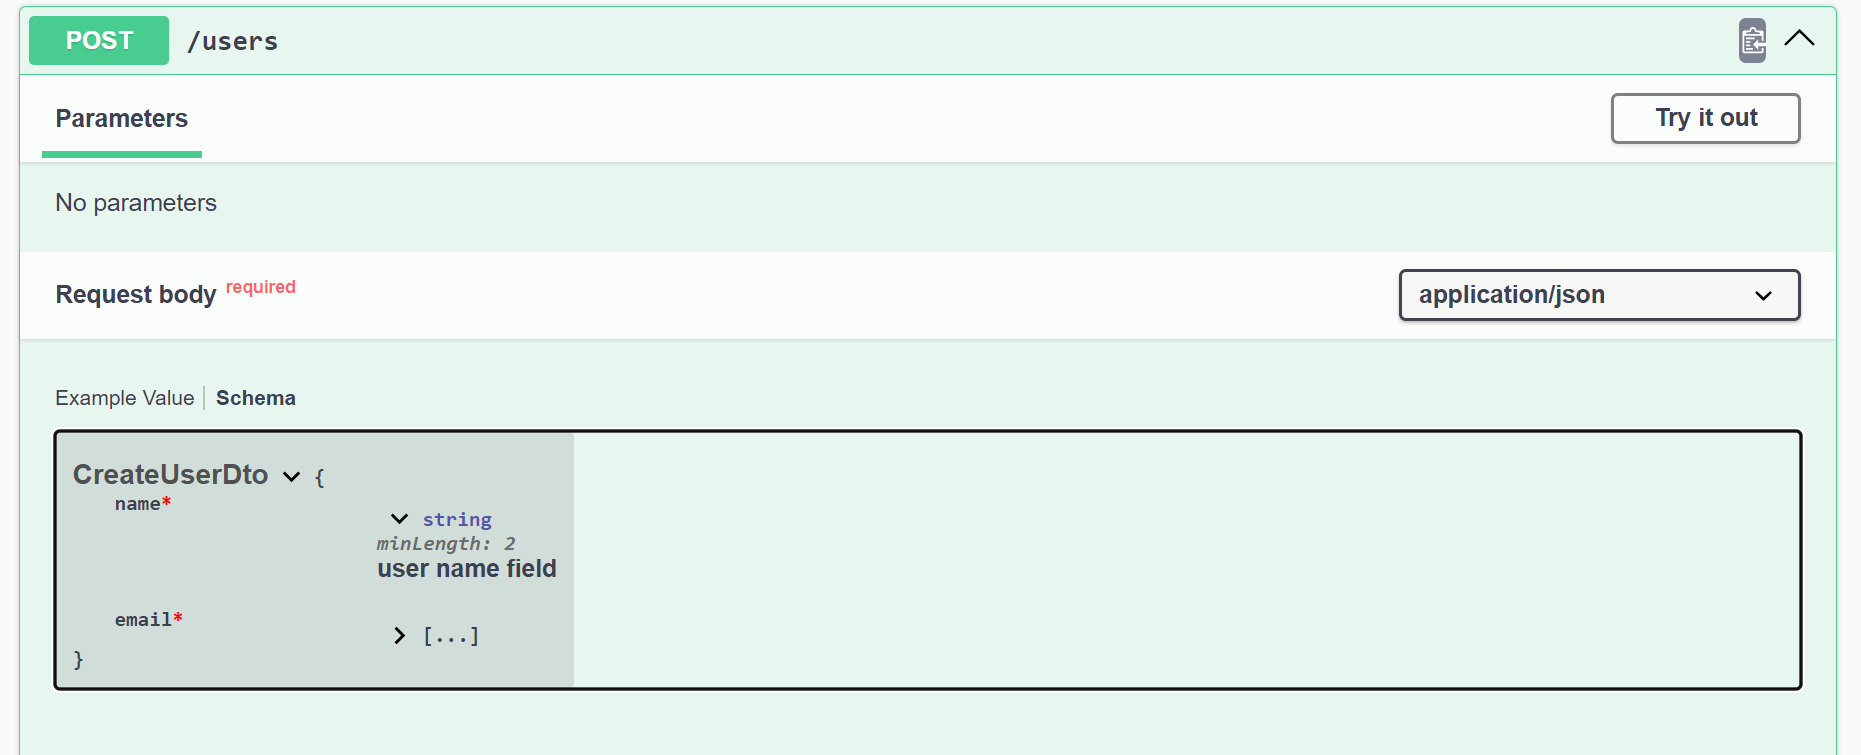
Swagger UI에서 각 field에 대한 type은 CreateUserDto class의 field에 설정한 type을 기반으로 자동으로 추론되지만 specification의 type을 직접 설정하고 싶다면 다음과 같이 type property를 통해 설정할 수 있다.
import { ApiProperty } from '@nestjs/swagger';

export class CreateUserDto {
  @ApiProperty({
    type: String, // string type
  })
  name: string;

  @ApiProperty({
    type: String, // string type
  })
  email: string;
}
type property를 통해 open api specification type을 직접 설정할 때 array type의 data는 다음과 같이 설정할 수 있다.
import { ApiProperty } from '@nestjs/swagger';

export class CreateUserDto {
  @ApiProperty({
    type: String, // isArray를 true로 설정하면 array로 취급된다.
    isArray:true,
  })
  name: string;

  @ApiProperty({
    type: [String], // 또는 왼쪽과 같이 string array로 설정할 수 있다.
  })
  email: string;
}
enum data type은 다음 중 하나의 방법을 통해 설정할 수 있다.
// enum keyword에 값을 직접 설정
export class CreateUserDto {
  ...
  @ApiProperty({ enum: ['admin', 'user'] })
  role: UserRole;
}


// typescript enum type을 enum property에 설정
export enum UserRole {
  Admin = 'admin',
  User = 'user',
}

export class CreateUserDto {
  ...
  @ApiProperty({ enum: UserRole })
  role: UserRole;
}


// const data를 직접 설정
const userRole = {
  admin: 'admin',
  user: 'user',
} as const;

type UserRole = typeof userRole;

export class CreateUserDto {
  @ApiProperty({
    type: String,
  })
  name: string;

  @ApiProperty({
    type: String,
    isArray: true,
  })
  email: string;

  @ApiProperty({ enum: userRole }) // type이 아닌 실제 값 설정
  role: UserRole; // type
}
위의 예제와 같이 enum keyword를 통해 enum을 설정하면 실제 specification에선 다음과 같이 추가된다.
- role:
    type: 'string'
    enum:
      - admin
      - user
만약 generator와 같은 tool을 통해 open api specification을 기반으로 code를 생성하는 작업을 하지 않는다면 크게 상관 없지만 generator를 통해 open api specification 기반 code를 생성한다면 위의 enum 선언 방식은 불필요한 중복 코드를 생성할 수 있다. 예를 들어 다음과 같은 상황이다.
export class UserDetail {
  role: UserDetailEnum;
}

export class AdminDetail {
  role: AdminDetailEnum;
}

export enum UserDetailEnum {
  Admin = 'admin',
  User = 'user'
}

export enum AdminDetailEnum {
  Admin = 'admin',
  User = 'user'
}
위의 같은 상황을 방지하지 위해선 enum type을 설정할 때 enumName property를 함께 설정해주면 위와 같은 중복 코드의 생성을 방지할 수 있다.
...

export class CreateUserDto {
  ...
  @ApiProperty({ enum: userRole, enumName:'UserRole' })
  role: UserRole;
}
위와 같이 설정하면 실제 specification에선 다음과 같이 components section을 통해 다른 곳에서 reference할 수 있는 schema로 정의된다.
...
role:
  type: 'object'
  properties:
    ...
    - breed:
        schema:
          $ref: '#/components/schemas/UserRole'

components:
  schemas:
    ...
    UserRole:
      type: string
      enum:
        - admin
        - user
만약 schema의 type을 직접 설정해주어야 하는 상황이라면 다음과 같이 open api specification을 설정하듯이 원하는 property와 type을 설정해준다.
...
export class CreateUserDto {
  ...
  @ApiProperty({
    type: 'object',
    properties: {
      name: {
        type: 'string',
      },
      status: {
        type: 'number',
      },
    },
  })
  rawDefinition: Record<string, any>;
}
oneOf, anyOf
open api speficiation type 중 oneOf 또는 anyOf type은 다음과 같이 설정할 수 있다. 다음 예제에서 test field는 oneOf type을 통해 user entity 또는 product entity일 수 있음을 명시하고 있다. 그리고 아래의 코드가 specification에 정상적으로 추가되려면 몇 가지 수정 사항이 필요하다.
import { Product } from 'src/products/entities/product.entity';
import { User } from 'src/users/entities/user.entity';

export class CreateUserDto {
  ...

  @ApiProperty({
    oneOf: [{ $ref: getSchemaPath(User) }, { $ref: getSchemaPath(Product) }],
  })
  test: User | Product;
}
우선 각 entity에도 @ApiProperty decorator가 추가되어야 한다.
user.entity.ts
import { ApiProperty } from '@nestjs/swagger';

export class User {
  @ApiProperty()
  name: string;

  @ApiProperty()
  address: string;

  @ApiProperty()
  email: string;
}
그리고 main.ts에서 설정한 createDocument method의 option중 extraModels property에 위에서 사용하는 entity class를 설정해준다.
main.ts
import { NestFactory } from '@nestjs/core';
import { AppModule } from './app.module';
import {
  DocumentBuilder,
  SwaggerDocumentOptions,
  SwaggerModule,
} from '@nestjs/swagger';
import { User } from 'src/users/entities/user.entity';
import { Product } from 'src/products/entities/product.entity';

async function bootstrap() {
  const app = await NestFactory.create(AppModule);

  const config = new DocumentBuilder()
    .setTitle('API example')
    .setDescription('The API description')
    .setVersion('1.0')
    .build();

  const documentFactory = () =>
    SwaggerModule.createDocument(app, config, {
      extraModels: [User, Product], // User, Product 추가
    });

  SwaggerModule.setup('api', app, documentFactory, {
    jsonDocumentUrl: 'api/json',
  });

  await app.listen(4000);
}
bootstrap();
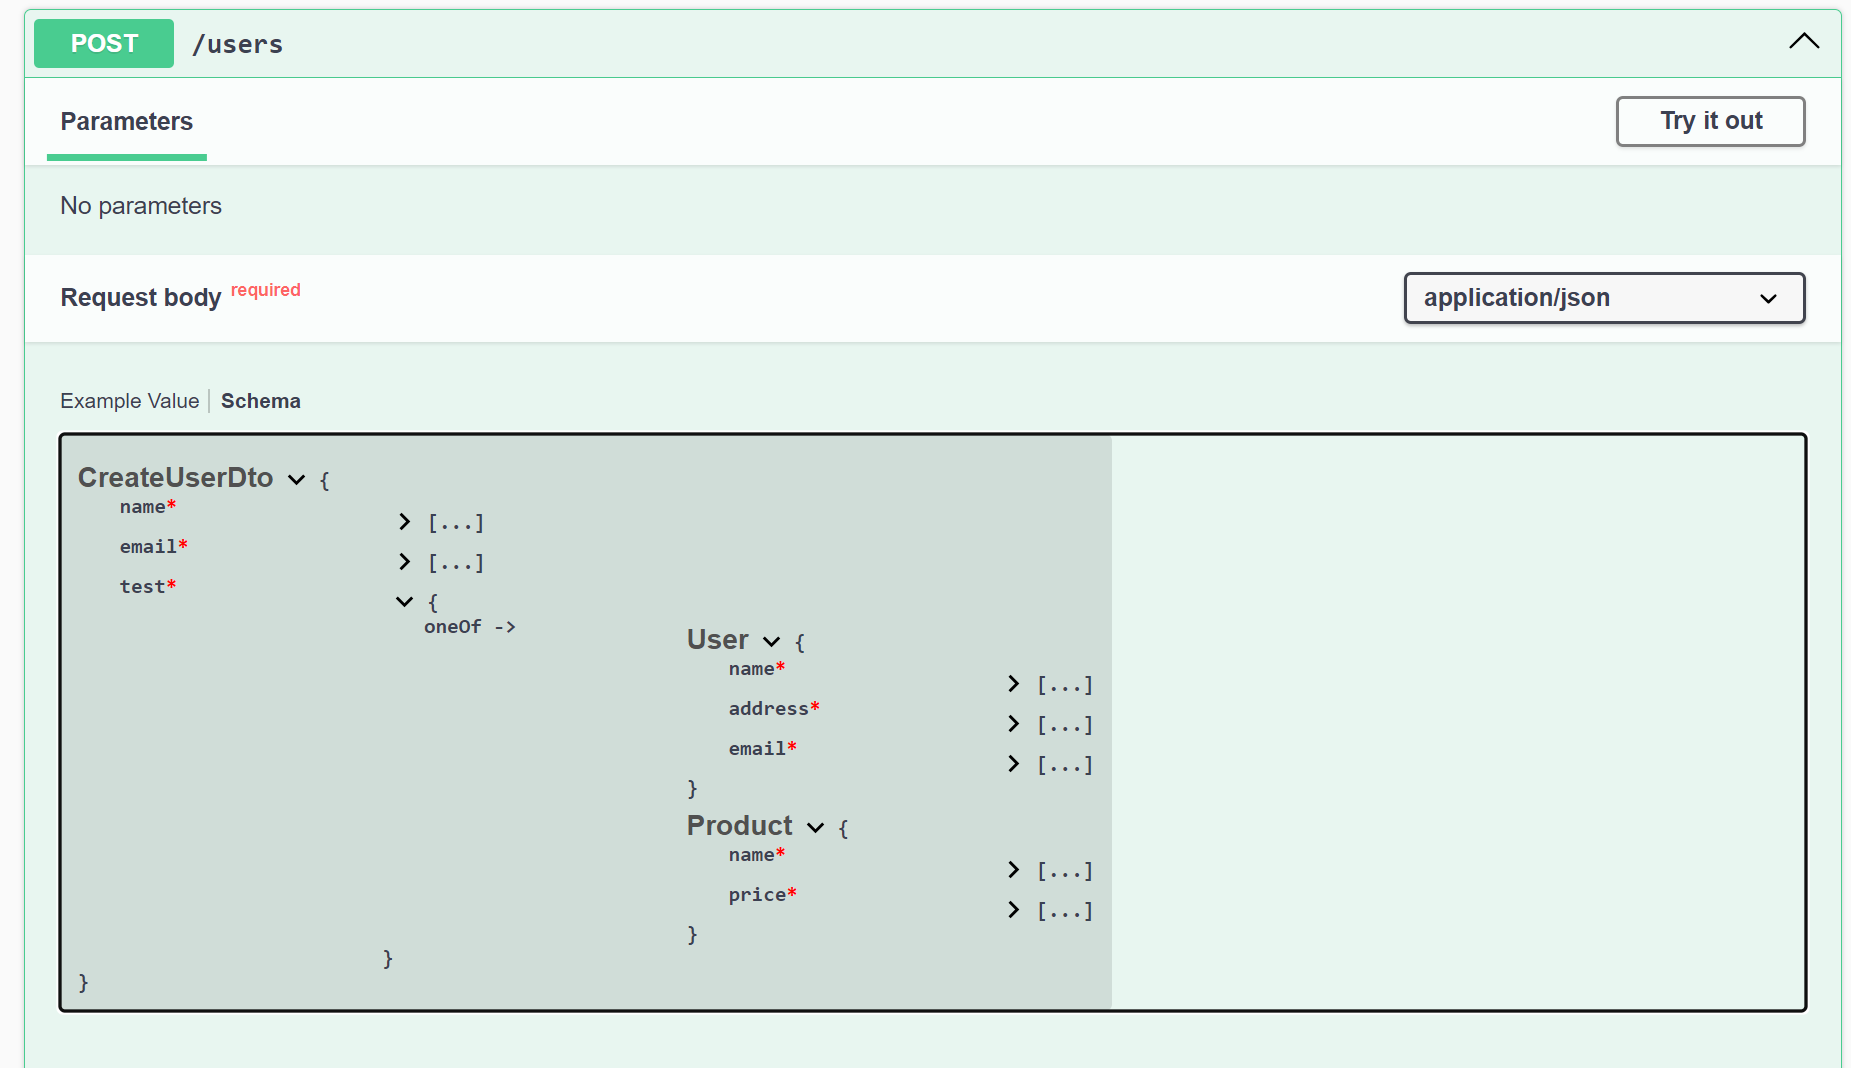
anyOf type도 동일한 방식으로 설정할 수 있다. @ApiProperty decorator의 oneOf property를 anyOf으로 변경하면 된다.
import { Product } from 'src/products/entities/product.entity';
import { User } from 'src/users/entities/user.entity';

export class CreateUserDto {
  ...

  @ApiProperty({
    anyOf: [{ $ref: getSchemaPath(User) }, { $ref: getSchemaPath(Product) }],
  })
  test: User | Product;
}
![[ 살펴보기 ] RDB - Relationships](https://cdn.hashnode.com/res/hashnode/image/upload/v1739711556668/48dc9e84-a621-42aa-9c9f-5fc5c436f0ec.jpeg)
![[ 살펴보기 ] MySQL - Data types](https://cdn.hashnode.com/res/hashnode/image/upload/v1739593589113/530f8704-4d27-42c9-a451-bb5c63150b99.jpeg)
![[ 살펴보기 ] TypeORM - Transactions, Migration](https://cdn.hashnode.com/res/hashnode/image/upload/v1739106042581/980b8133-61d4-406a-a026-65be9c28eace.jpeg)
![[ 살펴보기 ] TypeORM - Relations](https://cdn.hashnode.com/res/hashnode/image/upload/v1738666874402/b688bd0b-b6bb-4f43-87d8-c1b46b59f1b7.jpeg)
![[ 살펴보기 ] TypeORM - Basics](https://cdn.hashnode.com/res/hashnode/image/upload/v1738666803591/bef5df17-7dc7-4123-ae55-004d5042df39.jpeg)